
HEARTS A FLUTTER TABLE RUNNER
FINISHED SIZE: 13 1/2" x 49 1/2"

Valentine's Day is just around the corner
so I created another quick project that can be completed in a weekend.
It is Charm Pack friendly project. For this project I used Flirt by Sandy Gervais.
(It is now available in my SHOP)
(It is now available in my SHOP)
I also used an "old school" method to make the fabric hearts.
- (1) Charm Pack or (42) 5 " coordinating squares. The Flirt Charm pack came with( 9) red 5" fabric squares. If you are using your own fabrics, you will need (9) 5" fabric squares.
- (1) 20" X 56" piece of quilt batting
- 1 3/4 yards of backing material
- Pencil or Water Soluble Marker
- Glue Stick
Block Assembly
Note: All seams are sewn with 1/4" seam allowance
Step 1:
- Decide on the placement of your Charm Squares.We will be placing them into rows of (3) Charm Squares.
- If you are using a Flirt Charm Pack, be sure to remove the red Charm Squares. We will be using them later on to make the fabric hearts.

Step 2:
- Place the Charm Squares Right Sides Together (RST).
- Pin.
- Sew the Charm Squares together.


- Press the block open.

- With RST, pin the next charm square to the block.
- Sew the Charm Square to the block.


Step 5:
- Press the block open.
.jpg)
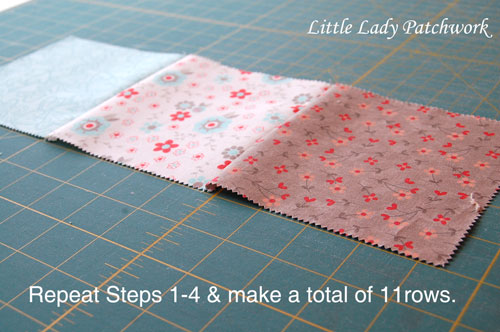
- Repeat steps 1-5 and make a total of 11 rows.
Step 7:
- With RST, pin Row 1 to Row 2.


Step 8:
- Sew the rows together.
- Press the block open.

Step 9:
- Repeat steps 7-8 until you have 11 rows sewn together.
HOW TO MAKE THE FABRIC HEART
Here is the "old school" method of making a heart. It is very similar to the way that we used to make paper hearts in Elementary School.
Here is the "old school" method of making a heart. It is very similar to the way that we used to make paper hearts in Elementary School.
Step 10:
- Take a red Charm Square and press it in half.
.jpg)
.jpg)
Step 11:


- Using a water soluble marker or pencil, lightly drawn half of a heart on your Charm Square.
- I started to draw my heart at the top corner of the crease and ended up at the bottom corner of the crease.
- Don't worry because it doesn't have to be perfect! These are supposed to be "free-formed" hearts. My hearts are not all the same size.


- Using your scissors, cut out your drawn heart.


- Press the heart open.

Step 14:
- Repeat steps 10-13 and make a total of (9) hearts.


- Using you glue stick, lightly place a dab of glue on the back of your heart. I used a water soluble glue that I "borrowed" from my Little Person's craft supply box :0)
- If you don't want to glue the hearts, then you can just pin them in place.


- Turn the heart over and randomly place it on the quilt top.
- I tried to keep most of my hearts going down the middle of the quilt top.


- Using your favorite method, stitch down the hearts.
- I used my regular 1/4" foot and stitched around the hearts. I left them raw edged.
.jpg)
Step 18:
- When you have finished stitching down your hearts, baste your quilt top.
- Quilt your quilt top using your favorite method.
- Bind your Hearts A Flutter Table Runner
Step 19:
- Enjoy your Hearts A Flutter Table Runner

 |
| Add caption |


Until Next Time...Happy Quilting

Cute little topper--I love "Flirt"!
ReplyDeleteNão me contive. Seu filho é um encanto. Amei as fotos. Parabéns.
ReplyDeleteCertamente ele é seu maior tesouro.
Que Deus proteja sua família que é linda.
Regina
I'm new to quilting..How much material for the binding??
ReplyDeletebeautiful!!! thanks.
ReplyDeleteLovely and inspiring, also looks like fun to make.
ReplyDeleteYou instructions are easy to follow, thank you
ReplyDeleteYou instructions are easy to follow, thank you
ReplyDelete